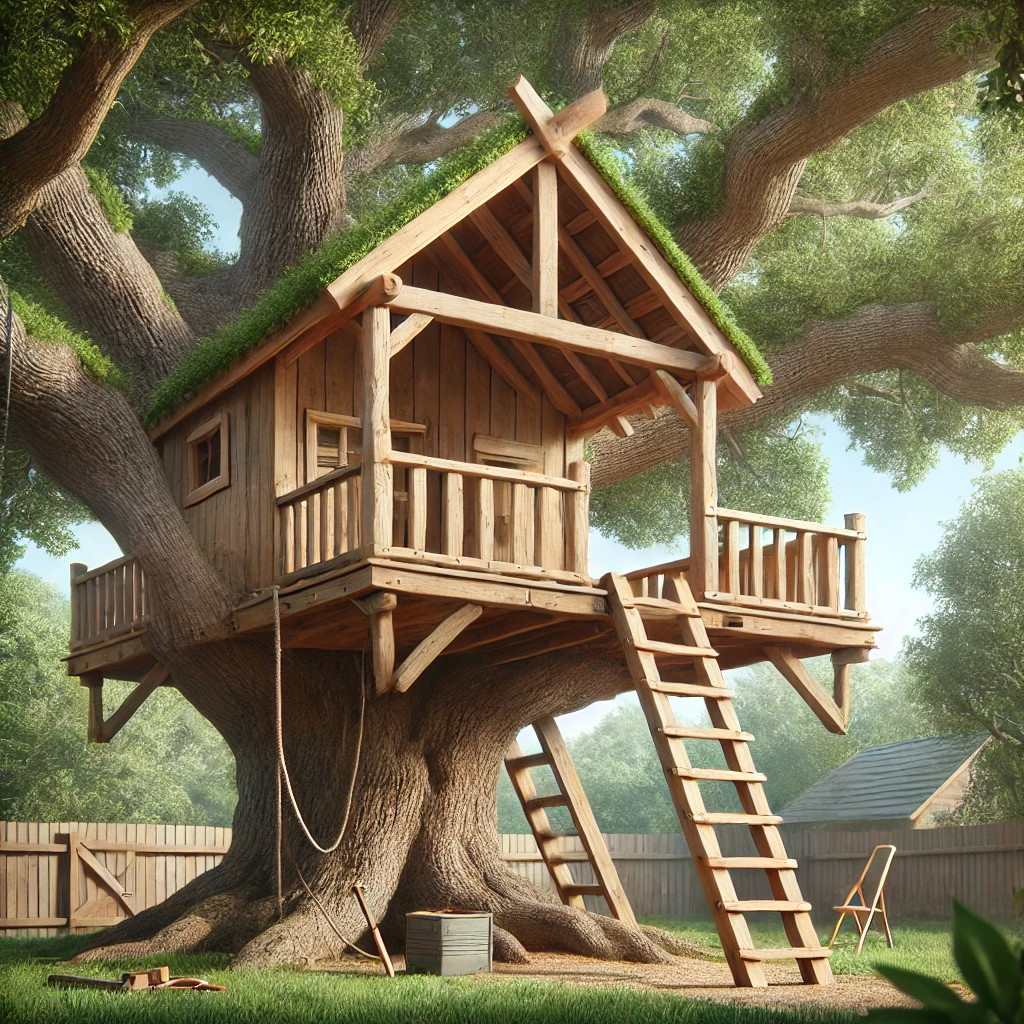
Building a tree house for your kids is more than just a construction project; it’s about creating a magical hideaway where their imaginations can run wild. Whether you’re a seasoned DIYer or a novice with basic tools, this guide will take you through the entire process, from selecting the perfect tree to putting on the final touches. So grab your tools and let’s get started!
Read
- 1 Choosing the Perfect Tree
- 2 Planning and Designing the Tree House
- 3 Gathering Materials and Tools
- 4 Preparing the Tree and Building the Platform
- 5 Building the Walls and Roof
- 6 Creating Safe and Fun Access Points
- 7 Adding Finishing Touches and Decorations
- 8 Ensuring Safety
- 9 Inviting Friends and Family to Enjoy the Tree House
- 10 Maintaining Your Tree House
Choosing the Perfect Tree
The first step in building a tree house is selecting the right tree. The tree will serve as the foundation of your structure, so it must be strong, healthy, and capable of supporting weight.
Criteria for a Suitable Tree:
- Type of Tree: Oak, maple, and fir trees are excellent choices due to their strength and durability.
- Trunk Diameter: Aim for a trunk that is at least 12 inches in diameter. This ensures the tree can support the weight of the tree house and its occupants.
- Height and Spread: Consider the height of the tree and the spread of its branches. You want a tree that offers enough height for a fun and adventurous space, but not so high that it becomes dangerous.
- Health of the Tree: Check for signs of rot, disease, or insect infestations. A healthy tree will have vibrant leaves and no dead or decaying branches.
Planning and Designing the Tree House
Once you’ve chosen the perfect tree, it’s time to design your tree house. The design phase is where you can let your creativity shine, but remember to keep safety at the forefront of your plans.
Design Considerations:
- Size: How many children will the tree house need to accommodate? Plan for enough space for them to play comfortably, but ensure the structure remains stable.
- Shape: Tree houses can be as simple as a rectangular platform or as elaborate as a miniature house. Consider your skills and the available space when deciding on the shape.
- Entrance and Exit: Will you use a ladder, stairs, or even a rope bridge? Think about how your kids will get in and out safely.
- Windows and Railings: Include safety features like railings around the edges and windows for light and ventilation.
Drawing the Plans:
- Sketch out a basic floor plan, including dimensions and the placement of key features like doors, windows, and any additional elements such as slides or swing attachments.
- Decide on the height of the tree house from the ground. A height of 6-10 feet is usually ideal for safety and ease of construction.
- Factor in any local building codes or regulations that may affect the height or size of your tree house.
Gathering Materials and Tools
With your design in hand, it’s time to gather the necessary materials and tools. The materials you choose will depend on your design, but here’s a basic list to get you started:
Materials:
- Pressure-Treated Lumber: This is essential for the frame and floor joists. Pressure-treated wood is resistant to rot and insects.
- Plywood: Used for the floor and walls. Opt for exterior-grade plywood for durability.
- Deck Screws and Bolts: These will hold your structure together. Use galvanized or stainless steel to prevent rusting.
- Ladder or Rope Ladder: For access to the tree house.
- Railings and Safety Netting: To keep your kids safe while they play.
Tools:
- Power Drill: For making holes and driving screws.
- Circular Saw: For cutting lumber and plywood to size.
- Level and Measuring Tape: To ensure everything is straight and properly aligned.
- Hammer and Nails: Basic tools for assembling the structure.
Preparing the Tree and Building the Platform
Before you start building, prepare the tree by trimming any low-hanging branches and ensuring the trunk is free of obstacles.
Step-by-Step Platform Construction:
- Attach the Main Supports: Begin by attaching the main support beams to the tree. Use lag bolts to secure the beams directly to the tree or suspend the platform with support posts if the tree is not strong enough.
- Build the Frame: Construct a square or rectangular frame using your pressure-treated lumber. This will be the base of your platform.
- Install the Joists: Attach joists to the frame, spacing them evenly to provide a sturdy base for the floor.
- Lay the Floor: Once the joists are in place, lay down your plywood sheets to create the floor. Ensure the floor is level and securely attached to the joists.
- Add Safety Railings: Finally, install railings around the edge of the platform to prevent falls.
Building the Walls and Roof
With the platform complete, it’s time to add the walls and roof. This will transform your platform into a true tree house.
Constructing the Walls:
- Framing the Walls: Build the frames for your walls on the ground first, then lift them into place. Secure them to the platform with screws or bolts.
- Adding the Siding: Once the frames are up, attach the plywood siding. You can leave gaps for windows or doors, depending on your design.
Building the Roof:
- Roof Design: The roof can be a simple slant or an A-frame. Choose a design that suits your climate and provides adequate drainage.
- Install Rafters: Attach rafters to the top of the wall frames. These will support the roof.
- Lay Roofing Material: Cover the rafters with plywood, then add shingles or metal roofing to keep the interior dry.
Creating Safe and Fun Access Points
Getting in and out of the tree house is half the fun. Depending on the height and age of your kids, you can choose from a variety of access methods.
Access Options:
- Ladders: A simple wooden ladder or rope ladder can provide easy access. Ensure it’s securely attached and stable.
- Stairs: For a more permanent solution, build a staircase leading up to the tree house. This is a safer option for younger children.
- Rope Bridge: For an adventurous twist, consider adding a rope bridge if you have another tree nearby.
Adding Finishing Touches and Decorations
Now that the basic structure is complete, it’s time to add the finishing touches that will make your tree house truly special.
Interior Decor:
- Seating: Add benches or cushions inside for a cozy place to sit.
- Storage: Install small shelves or hooks for storing toys, books, or snacks.
- Lighting: Consider adding battery-operated lights or solar-powered lanterns to keep the tree house usable in the evening.
Exterior Decor:
- Paint: A fresh coat of paint can make your tree house stand out. Choose bright, fun colors that your kids will love.
- Personalization: Add a nameplate or sign to the front of the tree house. Let your kids help with painting or decorating this.
- Flower Boxes: Attach flower boxes under the windows for a touch of nature.
Ensuring Safety
Safety is paramount when building a tree house. Here are some final checks to ensure your kids stay safe while enjoying their new play space.
Safety Checklist:
- Check Stability: Before letting your kids play in the tree house, check the stability of the structure. Make sure there’s no wobbling or weak points.
- Inspect Regularly: Trees grow and change over time, so regularly inspect the tree house to ensure it remains safe. Look for signs of wear or damage.
- Supervise Play: Depending on the age of your children, it may be necessary to supervise them while they play in the tree house.
Inviting Friends and Family to Enjoy the Tree House
With your tree house complete, it’s time to show it off! Invite friends and family over to see the results of your hard work. Plan a tree house party where the kids can enjoy their new space while you bask in the satisfaction of a job well done.
Maintaining Your Tree House
Finally, maintaining your tree house is key to ensuring it lasts for years to come. Regular upkeep will keep it safe and looking great.
Maintenance Tips:
- Check Fasteners: Periodically check that all screws, bolts, and nails are secure. Tighten any that have come loose.
- Repair Damage: Address any damage immediately, whether it’s a broken board or a loose railing.
- Clean the Exterior: Keep the tree house clean by sweeping out debris and washing down the exterior occasionally.
Building a tree house for your kids is a rewarding project that will provide them with hours of fun and a lifetime of memories. By following these steps, you can create a safe, sturdy, and magical hideaway that your children will treasure. Whether it’s a simple platform or an elaborate mini-mansion, the time and effort you invest will be well worth it when you see the joy on your children’s faces. Happy building!


Leave a Reply